
~ French Pillows ~
*Update video tutorial
This will blow your mind. No more messy oils or trying to put your fabric in your printer using spray adhesive. You can now make fast and easy projects with a woodworkers transfer tool. *Make Pillows, Tags, Cards, Memo Boards, Ribbons, Shirts, Clothes, Team Logos, Drapes, Gifts, etc! You can also use it on wood to make your own art.
Added bonus your fabric can be washed!✓
Hand washing is recommended. Please use cotton fabric!

I'm taking a peek to see how the toner transferred.
Supplies: laser printer, printer paper, cotton fabric, wood cutting board and a woodworker's transfer tool.
Pick out a picture you would like to use say from The Graphics Fairy. Now print it out on printer paper using your laser printer. Take the picture that you have just printed off from your laser printer and put it face down on your fabric. Plug in your woodworkers transfer tool and let it heat up. Using a circular motion press the woodworkers transfer tool onto the paper firmly. You can pull up a corner of the paper to see how you like the image so far. If you want the picture to be even darker go over it again. The nice thing about this project is once you place the woodworker's transfer tool onto the paper it will adhere to the fabric. Let's say your working on a large project you can finish it the next day. The paper will stay where you placed it on the fabric. It's ready when your ready!!! Another bonus is it will not smear.

My husband's wanted to see how easy it was to transfer the toner to the paper. He was amazed!

The woodworker's transfer tool works so good you won't believe your eyes!
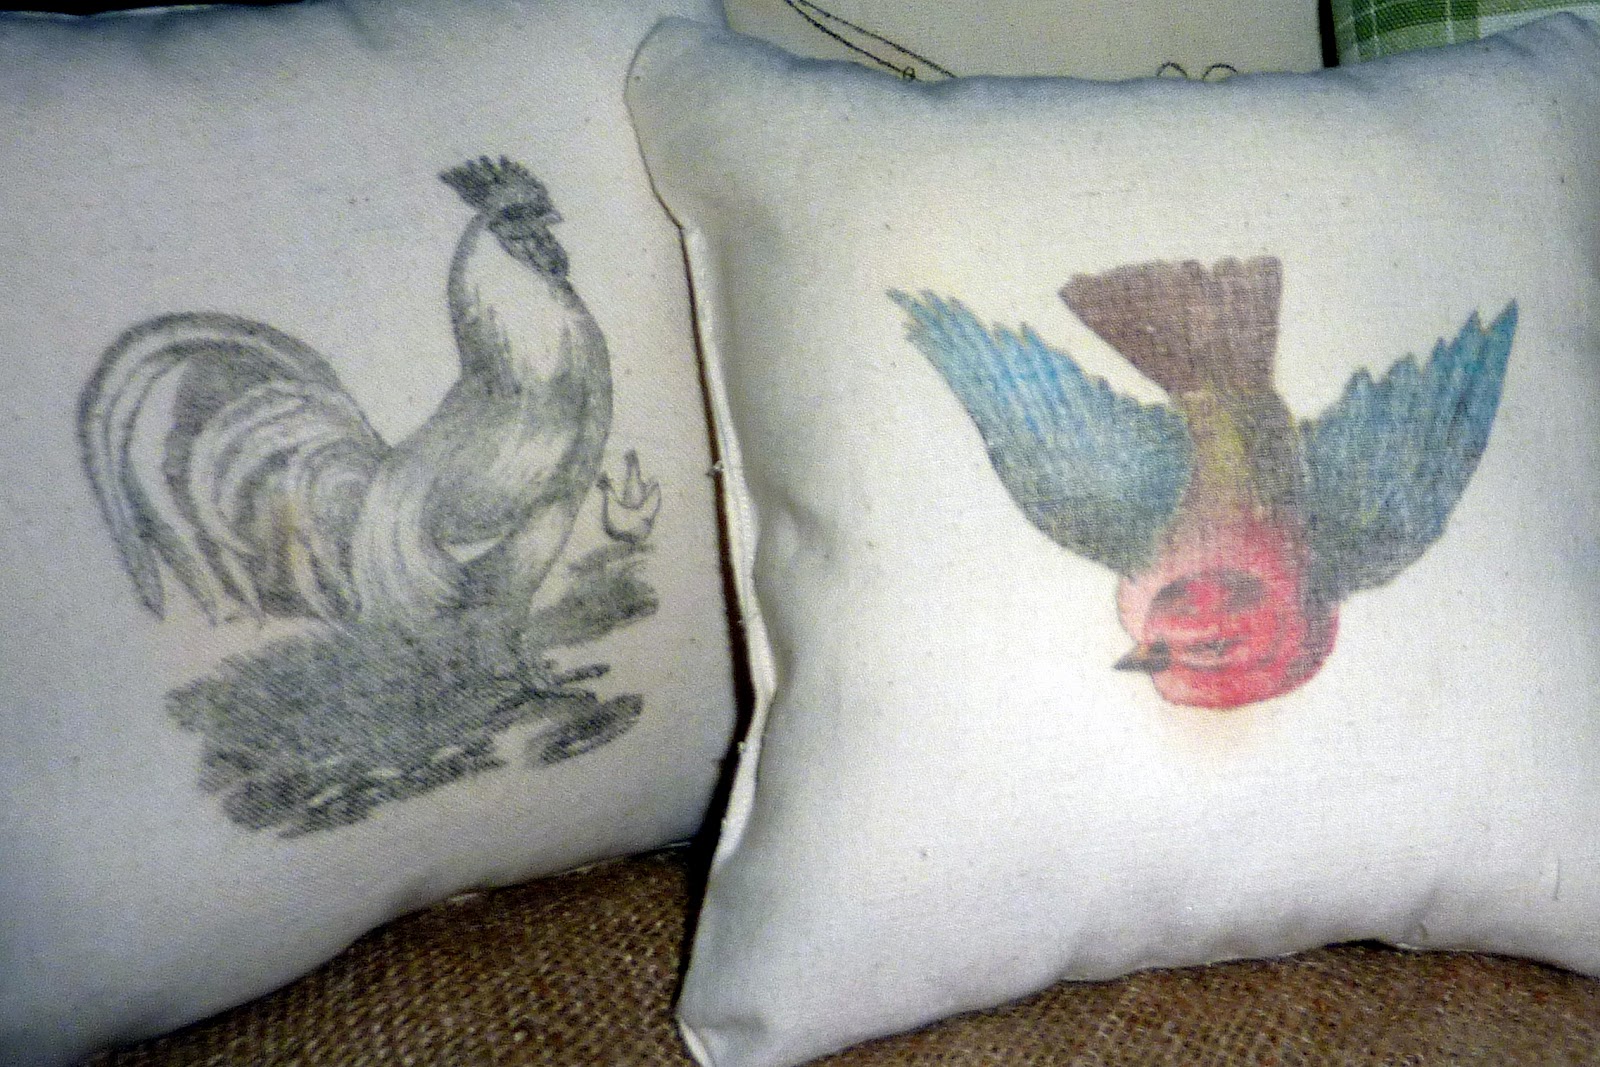
(The paper is on the left and the fabric transfer is on the right)

For this project I decided to make pillows.

You can print out your picture in color or black and white. Just make sure your using cotton fabric.
You can do this project on colored fabric too.


The woodworker's transfer tool is so easy to use.
Here I added burlap and I also used black coffee to give the light fabric an aged look.

*You need to make the picture a mirror image for letters
and numbers. Like this.

Now flip the printed image over on your fabric facing down.
In a circular motion press the woodworkers transfer tool onto the paper firmly. Your image will appear. It's that easy!!!! It also becomes permanent! I recommend using a wood cutting board to work on.

Here's a finished pillow.

I enjoyed finding pictures from The Graphics Fairy.
I love how the pillows turned out.

Don't forget to make a mirror image of your picture for letters and numbers.

Paris


I've also made an art canvas with a real picture using the woodworker's transfer too.

&

I hope you enjoy using the woodworker's transfer tool as much as I do!
If you would like to get the woodworker's transfer tool you can find it on my sidebar.
If you would like to get the woodworker's transfer tool you can find it on my sidebar.
(Don't forget to watch the video above!)
xo❤
Dee Lapin
I'm Joining:
97 comments:
I know I read this post and commented on it already {guest post somewhere?}, Dee, but I'm starting to actually consider getting this tool. It really doesn't sound like you can go wrong for the price if you get results like these. Okay, I'll put it in my wish list on Amazon and when I get some rewards I'll go for it!
Is amazing! I'll check it on Amazon!
We can wash the final project?
Hugs
Charo
wow, sooooo clever and awesome, I need to seriously try this, thanks!
This is a great craft project! I can't wait to buy this tool and get to work! Thanks so much for a great tutorial!
wow,, thats so cool,, beautiful!!!
I love this! Amazing! Thanks for sharing! I love each one that you shared!
These are fabulous! What a great idea.
Happy PS weekend ~
TTFN ~
Marydon
There's only 2 left on Amazon... I have a question. I know you have to use cotton, which is fine, Is that because of the heat the tool generates and if so, would it work on pure linen?
Hi Rhissanna,
I'm sure Amazon will have more woodworkers tools soon. Yes of course pure linen would be perfect for this project. I just said cotton because poly could melt. :-)
xo,
Dee
Dee, What a fabulous idea and I love the results! Your pillows are wonderful.
Hugs,
Sherry
This is so great!!!! Thanks for sharing!!
These are all so totally amazing, my friend!! Come on over and look at my blogs--you're featured AND you're welcome to take the Guest Artist button from my sidebar on my magazine blog!!!
XO
Cindy
I posted earlier but I just wanted to tell you that I just ordered this tool from Amazon. My head is full of pillow project ideas!
Hi Dee,
You did ¨blow my mind¨indeed. That looks and sounds fabulous. The results you showed us are excellent! What else we can dream about but to own this tool. Thanks for sharing!!!!
Blessings,
Nádya
Wow, this is amazing! Thanks for sharing and for the great tutorial, too! Popping over from Cindy Adkins:)
Hey Dee~
A new heat transfer technique, cool! And it does look pretty darn easy. Thank your hubby for showing us even a guy thought so. :)
This is such a neat technique! Your pillows are great! Now if I only had a woodworker set and a laser printer.
Hi Dee, I saw you featured on Cindy's blog. She is right your work is beautiful, what a wonderful idea to transfer images!
This is very interesting. My daughter and I were talking about something like this today...In her boys room, she wants to use white cotton fabric and have some of the boys pictures printed on the material in black and white...
Can you use this tool and method for transferring pictures?
shug
Well hello Dee! What a creative girl you are! I've been having a wonderful browse through your blog and I'm quite blown away with your talenty. Fantastic work and THE most beautiful photography.
Thank you so much for your visit and for following me.
Big Hugs
June xx
Cool idea, Dee. I'll give it a whirl - (too bad for me, my laser printer only prints B&W!) color looks great, but B&W is effective too.
A GREAT tutorial ! Thank-you Dee!
Thanks so much for stopping by!
love, kelee
Wow Dee, this is so gorgeous. I would love to try this sometime. we do not have a laser printer. Something to think about. The results are amazing. I love your pillows. Thanks for the demonstration.
Hugs, Jeanne
Well, who'd have thunk it? What a fascinating idea!!! I guess I never thought to use any woodworking or woodburning tool on fabric. And you've done it to great effect! Stunning work!
Rose
Absolutely fantastic! When you say printer paper, are you talking about just regular paper or something in particular? Thanks for sharing this great idea!
You are so clever DEE...I spied that rooster and love it. Thanks for sharing your tips and the graphics too.
Thanks for sharing this great tip. I'm definitely gonna add a woodworkers transfer tool to my wishlist!
I love this project a second time this week! ;)
Hope you will please drop by and enter my $50 Overstock.com Gift Card Giveaway!!
great idea, now all I need is the laser printer and the woodworkers tool! Why oh why do I want everything gadget that I see??? Thanks for sharing such a wonderful process!
Debbie
AWESOME! Thanks for sharing Dee.
This is so cleaver and awesome! Great tutorial too! Thanks for sharing:)
Hope to see you on my blog:)
That's really cool! I LOVE how the stamp pillow turned out. Visiting from Amaze Me Monday.
This is the greatest idea ever. I love it Dee. I have so many ideas in my head and I'm asking for a laser printer for Christmas so I can make lots of things. Thanks so much for sharing this with all of us. rj
oh wow i need to find this tool :)
I'm inviting you to add this to our linking party at
http://www.passionatelyartistic.com/2011/07/american-pickers-with-linking-party.html
Have a great weekend,
Maggie
You are so clever! I'm sure one the great men in my life (Hubs, Dad, or brother) have one of these tools. I really want to try this! Thanks for sharing.
Wow, you ARE clever and this project is awesome! I happen to have wood worker tools.......color me inspired!
What a great idea! Unique and so clever ~ thanks for sharing.
xo
Pat
What a great idea! Unique and so clever ~ thanks for sharing.
xo
Pat
Wonderful! Great hints.
This is so cool!! I tried it about a year ago when I heard about it and I don't know what I did wrong, but it didn't transfer. I will definitely try it again.
Does the copy need to be 'fresh' off the printer? That might be what was wrong with mine.
Your pillows are beautiful.
Rhonda
This is a great idea. I never liked the idea of printing onto pillows that you couldn't wash, so this solves that problem.
Cheers
Kylie
Answers to questions.
Go ahead and wash it! No problem!!!
Just make sure to use cold or warm water.
Real photo's work too not just drawings when your using the woodworkers transfer tool. A real photo's becomes a canvas photo in looks. It's very cool and easy to do.
xo,
Dee
Hi Dee~
I have a couple of more questions. Is the way to do a transfer image is to flip it in a program on our computer?
If the picture is color, then does the heat from the tool transfer the colors on? (that's cool)
When I went to Amazon to look at this, I saw there are others they have on that page? Do you have this basic one?
Thanks for your help!!
Holly
Your pillows came out beautiful!!Thanks for the tutorial.Wonder if it works with inkjet printers too.
XO Marie
Here is another tip:
How to make a mirror image of your photo's. I use Picasa for my pictures. Go to picnik in Picasa and from there click on edit in picnik. Next click on rotate. Where it says flip click on either button. After that in the middle you can also straighten your picture if needed. Then click OK and save to Picasa. EASY!!!
xo,
Dee
One more question from Holly
Just the tool on my sidebar is all you need for this project.
Happy crafting,
Much Love,
Dee
Inkjet printers will not work for this project. You can take your picture to Staples and there they can make a black and white or color laser copy.
Staples will charge about:
black and white laser 20 cents
color laser 50 cents
The reason the inkjet printer does not work is because that printer actually sprays water-based ink onto the paper. A laser printer creates the image by melting toner which is a powdered plastic onto the paper. The woodworkers transfer tool remelts the toner off the paper and onto your fabric.
This now creates a waterproof image on your project.
Dee
thank you so much for sharing this great idea! I saw your post over at the Newbie Party and Debbie's.
amazing! i love it. are they washable? how do you make a mirror image? thanks for sharing this at my party!
THIS IS SO COOL!!!
I am jumping up and down!!!
You see, I have a laser printer. I do not own an ink jet printer. I have wanted to make pillows and more for a VERY long time, but without buying citrasolv OR an ink jet printer and ink, I was out of luck. Also, I wanted to be able to wash it, since my six small children do not leave the furniture clean.
You are wonderful! THANK YOU THANK YOU THANK YOU!!
Now, there was another reason I kept considering an ink jet printer--so I could make shrinky dink jewelry. If you have a solution for that in mind, using my laser printer, I will love you forever!
(why, yes, I AM rather giddy about this!)
Hi Dee :-)
I came to your blog via The Graphics Fairy.
Thank you for sharing this fantastic tip with us! If only I had a laser printer :-(
I am now following you and look forward to seeing your future projects :-)
Emily
http://emilysummers-designer.blogspot.com/
What a great tip - I am now off to buy a transfer tool!!
Chelsea
These are fabulous Dee! Clever idea using the transfer tool.
Stopping in from Debbie's.
Dee,
This is not working for me and I am feeling rather down about it. I am trying to make a birthday present for my daughter with it.
I am using 100% cotton muslin. It is BARELY transferring onto the paper. In most places it is not going. It is certainly not as dark as yours. The darkest spot is where it burned (I put the tool down for a moment, and when I picked it up it burned the fabric as well). It is also leaving burn marks on my cutting board.
Does it only work well on thick fabric? My fabric is thin muslin.
I don't see a way to email you. I know you are busy cleaning up after the storm, but if you get a moment, please contact me. I was so looking forward to finally making some projects, and I'm feeling very sad that this isn't working.
Hi Brandy,
Press a little firmer when your using the woodworkers transfer tool and move the tool back and forth so it does not get too hot in one area. A piece of cardboard might be all you need to make the fabric a little more stiff. Place the cardboard on the cutting board then the fabric.
If you need more help let me know.
I can always make it for you if you prefer.
xo,
Dee
DeeLapin@gmail.com
LOVE this!
Your blog is wonderful!
I'm hopping by from katherine's blog hop and I'm so glad I did. I will probably blog about this on a future post and will link it over to your blog and give credit where credit is due.
Hope you'll hop by and visit Style 'n Decor Deals.
New follower!
Nancy
http://stylendecordeals.blogspot.com/
Those pillows are fantastic. Think I'll give myself an early birthday present and order the woodworkers' tool! Thanks for sharing this excellent post. I'm a new follower.
Omigosh I could just jump through my computer screen and kiss you right now! I can't wait to order this fabulous tool. Also, I would love to buy that green check pillow with the burlap on it. Name your price - seriously! Is it for sale???
xoxo,
Kim
Wow, too cool - they all look fabulous!
yeah thats cool.
I'm sold! Your pillows look awesome. I'm off to order my tool now. Thanks for sharing and for the inspiration.
Ohhh my gosh I love it!!! I am so excited that I am off to order one ~
Thank you for telling us about it ~
This is rather nifty! I had seen all kinds of image transfer techniques with mod podge/Citra Solv/packing tape etc. This seems the cleanest. One concern is you don't mention if this tool gets hot. If so, does it not burn the paper that you are rubbing on? I want to make sure there is no fire hazard. Please let us know, thank you so much for sharing. Your pillows are just awesome!
I forgot to mention that one can use MS Word to flip images and get mirror images easily. Just click on Help in MS Word, search for "flip images" and it will tell you how to do it. You don't need any fancy software or even Picasa etc to create mirror images for transfer.
Great tip! I am planning to purchase the tool via Amazon. How can I follow your blog by email (not via blogger dashboard)? Thanks! cbrayack at hotmail dot com
The transfer tool does get hot. Kind of like a curling iron. If you feel you are burning the paper have an old towel nearby. Touch the towel with the woodworkers transfer tool first then go back to transferring the image. Sometimes I do char the paper as it makes the transfer look aged. It all depends on the look you are going for. Have fun crafting!
xo,
Dee
rK,
That is a great tip!
Thanks,
xo,
Dee
oh, i am so loveing your birdie pillow! i would love to have a sewing machine and pretty sure my printer isn't a "laser" printer either....:( would love to try to make these - you make it look so easy and fun! xoox, tracie
The birdie is amazing ..her wings are so pretty! I may have to learn how to do this transfer!
Thank You so Much for sharing this Wonderful Tutorial!!! I can't wait to try it! I bet Amazon is selling out on the transfer tool!
Thank You Again!
Have a Wonderful Evening!
Hugs
Jill
http://feathersandflight.blogspot.com/
Oh now that is cool! Does it take long to transfer a large image? You've got my thinker cranking now. I'm going to have to check out that tool. Thanks for visiting my blog and following. I'm following you back because I love your ideas! :)
I bought this tool yesterday and cannot wait to use it! I was going to buy a 200.00 yudo silk screen machine but this is so much better. I saved money, time, and I can use it on wood. I will be posting pictures of all my projects. You know the lady who bedazzled everything in her house including her husband’s things well I am going to use this tool on everything. Purses, pillows, cutting boards….LOL Thanks for posting about the tool!
This is so great...thanks for sharing your technique! I'm a new follower!
I can't sew. I hate painting. Can't even cut straight. Can't draw even my stick people look awful. But I can print from a laserjet and transfer with a woodworkers tool! Thanks, can't wait to try my own hand at this.
~Bliss~
I just use my iron to transfer laser prints to fabric. It's always worked great for me!
Wow, that's really cool! However, can you enlarge the print? (larger than 8.5 x 11?)
thanks for sharing your link!
gail
I am so excited by this...I already own a heat transfer tool I bought off QVC years ago! Can't wait to try this...I have an ottoman calling my name as we speak!
VERY COOL,, i SAW YOUR LINK OVER AT gAILS BLOG.. THANKS FOR SHARING. I;D LOVE TO TRY THIS.
Dee I am amazed!! Your projects turned out perfectly. Now I must get the woodworking tool!@
xoxo
Karena
Art by Karena
Hi,
Just thought you would like to know that someone hijacked your links in this post. Mirror image goes to a window glass company, pictures from the graphic's fairy goes to an art web page, Turned goes to a stock quote place. I am sure it is as frustrating to you as it was to me.
Loved your post. Thanks.
Dona
After you commented on my vintage bird tags, I thought I'd stop by to check out your blog ~ and I am blown away by this idea! I've been seeing all these (scary) ideas for feeding fabric through my printer, and it just seemed too risky! Thank you so much for this idea :)
Wow, thank you so much for this information and tutorial...it's fantastic.
I am so afraid to print on fabric for fear of ruining my printer...this is the best.
Thanks again...love your blog.
Karen
Thank you for your wonderful tutorial! Inspired by you, I purchased a woodworker's transfer tool from Amazon. I also had to get a step down transformer (because of the difference in the electricity output here in Australia). I was just wondering what sort of laser printer you use? We recently purchased a Fuji Xerox and it doesn't seem to work with the transfer tool.
Thank you for any help you can give me
Stacy
Hi Stacy,
Thanks so much! I'm so glad you liked the video. I use the Samsung laser printer with my woodworkers transfer tool. It's on my sidebar.
xo,
Dee
Thanks Dee I will have to get one
Stacyx
Love it! Thanks for linking!!!!
Xo
This is one of those lightbulb moments! What a fabulous idea - and your pillows are amazing - especially love the cancelled stamp!
Pinning!
Kelly
Being in Canada, the amazon link is not ideal, so I went looking for the same tool up here, and thought I would share my adventures so other beginners don't have to do all the heavy lifting. :)
Before I get in to details, the essence is that this is a very generic tool, so as long as it heats up enough and has the right shape at the end, you're all set!
Point 1: A "Woodworker's Transfer Tool" is very simply a hot iron that gets up to 900-1000 degrees.
Point 2: Being a very generic type of tool (heated metal) The tool can be named many things, but most usually it's a "Heat Transfer Tool", "Woodworker's Tool" or "Woodworker's Kit". Can even be called a "Versa-tool", Pen, or "Hobby tool"
Point 3: Most of these irons come with multiple tips. The tip you want is the "Transfer" tip (picture in the article). In some cases, you can simply purchase the transfer tip as a screw-on attachment (I'm not sure if they work between brands)
Hi, I've discovered not all laser printers work for this. What type of laser printer do you use? I'm trying to buy one that will work. Thanks
Does it have to be a laser printer? Could you use inkjet w photo paper?
I am swati, I am also a web designer and I like your blog too much the colors and themes are really nice.
Do visit my blog buy woodworking projects
Oh my gosh I can't get to my local Lee Valley Tools fast enough for one of these babies! Found this over at the new Simply BeBetsy page.
Marie@TheInteriorFrugalista
I bought the woodworker's tool from Amazon and it keeps burning my paper. The back of the packaging for the tool even explains how to do transfers to fabric - and says to print on 24 lb paper - which I also tried. There doesn't seem to be a heat setting on the tool - it's either on or off. I am a bit disappointed - I guess I'll try using my iron like someone else suggested.
Hi Chris,
Don’t give up using the woodworker’s transfer tool. It’s so much fun to use. It may be that you’re heating the tool too long. Keep an old towel by you and rub the transfer tool on it before using it on the paper. That should help you to stop burning the paper. Don’t forget to watch my video.
Happy Crafting!
XO Dee
Can this work on glass, also do you need a laser printer or does this work with inkjet printers?
Post a Comment