
Would you like to make an easy burlap picture? All you need is burlap, stretched artist canvas, scissors, pictures from your laser printer, staple gun and glue.
'If you don't have a staple gun you can use glue.'
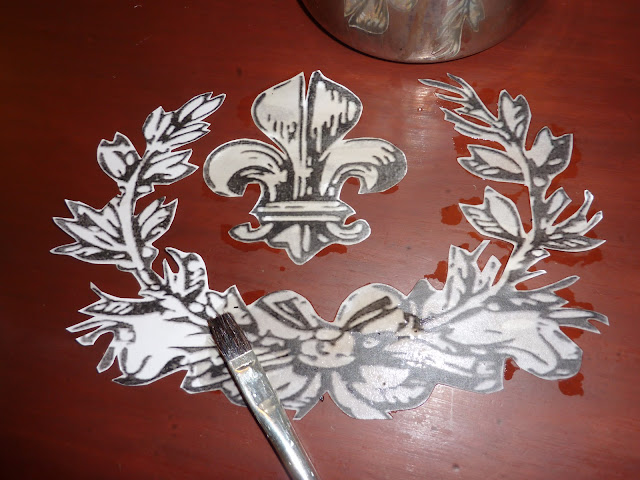
I printed out the pictures that I liked and put a little 'Golden Oil' on them. This step can be omitted. I just like how the paper cuts after the oil dries. Take your time cutting out your designs.

If you need to iron the burlap do so now.

Here I'm just checking for fit.


Off to the basement to staple the burlap to the canvas frame.

The burlap is now stapled on and just about ready to start gluing on the designs.....
Now is a good time to cut the burlap to clean up the edges along the frame.


Very easy to hang.


The white printer paper was to white. I just fixed it by painting on cold coffee you could also use tea. I let it soak in and then blotted with a paper towel. Make sure the designs are dry before moving onto the next step.

The next thing I did was add STOP fraying to the backs of the designs. I did this due to when the STOP fraying dries it becomes tacky. This makes it easier for the design placement. (Not at all Necessary.)

This is my test run to see how I like the design placement.


I used Sobo glue. You can use any glue you have on hand.

Here is the finished burlap leaning on my corbel.

This is a gift for my friend Kelly. She is going to love it!
Kelly is hooked on all things french just like my friends RJ and Mary.

I finished off the back of the canvas with brown paper,
copper-wire from a lamp cord and eye hooks.


If you love my projects I would LOVE your pins;)
I'm Joining:
24 comments:
Dee I've had about three comments go away but I'm giving it another try because this is such a fabulous project. You did such a great job and I know that Kelly will love it to pieces. It is perfect. And you gave such great directions too. What type of scissors did you use to cut such fine detail? Great job once again. I love it. rj
RJ,
You’re the best for trying to post that many times! I adore you!
I used my regular scissors that I posted in the picture. Small curved nail scissors would be even better though. I'm artsy so the big scissors are not a problem.
Kelly has no idea what I made her. I can't wait to see her reaction.
The real fun will be when we go to the showhouse next week.
XO
Dee
That came out lovely and what a great tutorial. Good post.
So very cool! I love burlap projects, they are so much fun. Thanks for sharing with newbie party.
This is great - perfect for Mother's Day.
Kelley is going to love this, it's adorable and yes, I love the step by step directions, so kind of you to do that!
Mary
very cute project! thanks for visiting me at my blog too!
What an awesome project! It looks great - I'll have to try something like this.
Now following you too :)
I can't wait for my friend Kelly to open her gift. Working with the burlap was a fun project. It just takes time cutting out the pieces.
I enjoy showing you my projects!
The feedback I’ve received is wonderful. Thanks so much for caring enough to post.
Love,
Dee
I love this. It looks so expensive. Can't wait to make one for my home.
Christina
Ahhh burlap... you found my weakness :) I am accumulating burlap project ideas for my office, and this technique just went to the top of my list! :)
Great idea! If you wet the brown paper - either with a spray bottle of wet cloth (sponge), the paper will shrink and you'll have a nice tight backing to your artwork.
this turned out awewsome!! love it. where did you find your graphics? i would love for you to link up our project at our link party going on all week.
Amy
www.Sistersofthewildwest.blogspot.com
Thank you, Dee! I can't wait until my 40% michaels coupon period comes around so I can buy a canvas! I love burlap :) Thanks again!
Wow I had no clue everyone was doing it with a printer and paper I was wondering where they find all those neat plastic stencils I have looked everywhere for them thank u for the tutorial.
I loved the project, no transfer paper, no stencils, and the final result looks just fab!!!! Thanks for sharing...
blessings,
Nádya
P.S. I gave it a try and made a tin can using your technique...here it is
http://mundodoshandmades.blogspot.com/2011/07/novas-pastas-e-latinha-new-folders-tin.html
Thanks once again...
SUPER! LOVE it...TFS~
Hi Dee! Thanks so much for sharing how you made this fabulous antiqued art piece...I'm sure your friend will just love it. I like that there are not any complicated steps (like doing a "mirror" image on a computer, etc.) in achieving this great look. I saw your post over at "At the Picket Fence".
What a great project! Thanks for the great how-to!
Nice project! Thanks for sharing a Potpourri Friday!
Your blog is great. I love anything French. I am re-doing my living room over in a more shabby french decor. I have been transfering and painting. I love your idea of this burlap canvas. thanks for sharing the images. I am a new follower here.
What a great blog! I popped in from Isabelle Thornton Le Chateau's blog and love your latest post. I recently purchased at a garage sale a stretched canvas and now I have some great ideas (thanks to you) that I'm going to work on. LOVE the burlap covering.
I went to France for the first time last October, so everything French makes me SO HAPPy! Happy Spring Ya'll from Houston, TX!
Great job!
Thanks for linking! I have another French party going on! Come link!
Xo
http://lechateaudesfleurs.blogspot.com/
All you need is burlap, stretched artist canvas, scissors, pictures from ... framedcanvasart.blogspot.com
Post a Comment